Electron app continuous integration
This article describes the hurdles I went through when automating an Electron build with release to Mac App Store, Microsoft Store, Snapcraft.
I have released LosslessCut to stores on three different platforms Windows, Mac and Linux:
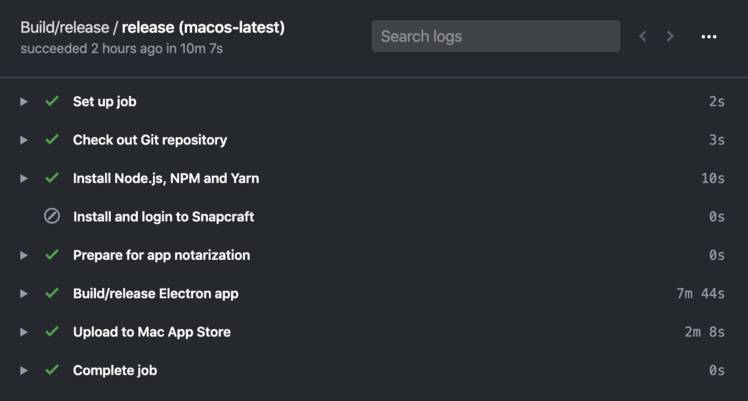
I believe the key to any well-maintained project is to have an automated release pipeline, or else it will be a hassle every time one wants to do bug fixes and improvements. I have now taken some time to set up automated build and signing for Mac OS (notarization) as well as release to the Mac App Store, Microsoft Store and Snapcraft. I have used many CI systems but I find that the new Github Actions are very fast and feature rich, and with its reusable action ecosystem it is quite easy to use. And all the setup and configuration is of course available open source for anyone to see here. See the actions in action(heh) here, as a free reference for anyone else needing to set up an automated build and release process of their Electron app.
Building and releasing for big stores like Microsoft and Mac App Store can be a true nightmare that can take weeks to set up, however thanks to awesome projects like electron-builder and action-electron-builder, it is not really that bad and only took me a few days to setup, and once setup the code is automatically built and ready to be released. The only recurring task is regenerating Apple certificates and provisioning profiles once per year.
The things that I had the most trouble with when setting up were:
Correct metadata
Getting all the correct metadata in place was mostly handled by electron-builder and can be seen in package.json, but some things did not give an error until a human looked at it during the review process.
Hardened runtime
In package.json, hardenedRuntime needs to be set to true for the mac platform, because notarized apps need to be hardened.
However for Mac App Store signed apps mas, it needs to be set to false.
Microsoft Store
Microsoft Store review
Reviewers complained about:
- Screenshot did not have Windows style border, but Mac style. Easy fix.
- Missing icons in
appxXML config. Need to be configured correctly inpackage.json: https://www.electron.build/configuration/appx#appx-assets
Mac App Store
The entitlements files
These files need to contain the correct entitlements in order to be able to open files and directories on the filesystem, as well as inherit these rights to the ffmpeg process. Without any entitlements, the app is not allowed to read/write files.
One thing I struggled a bit with is that Mac Store Apps need to have opened a file using the system open dialog before the app can read or write. In order to write to a directory, like LosslessCut does, I need to first present the user with an Open dialog to select which directory to output to. This seems to be a requirement in order for apps not to just write to any folder on the system.
App Icon
Icon needs to be .icns format and have 512 and 1024 sizes in it
Touch Bar API
Reviewers complained about what I believe is Electron using the Touch Bar API, but my app does not use it:
"If your app does not integrate Touch Bar functionality, please indicate this information in the Review Notes section for each version of your app in iTunes Connect when submitting for review"
So need to make sure to write this in Review notes for every release.
ffmpeg private API usage
Getting ffmpeg through App Store review is a bit tricky. The ffmpeg static build that I originally used has a lot of stuff built into them. One thing that App Store review complained about is a call to _SecIdentityCreate which I traced back to this file. But it could be disabled by the --disable-securetransport option. So I needed to build a custom ffmpeg without this flag.
nm ffmpeg | grep SecIdentityCreate
nm ffprobe | grep SecIdentityCreate
See also:
- https://github.com/electron/electron/issues/5618
- https://stackoverflow.com/questions/47629110/ffmpeg-gets-aborted-in-an-electron-sandboxed-application
- https://github.com/AndrewSchenk/App-Scanner
Other than that, with Electron 8, there was no other private API usages complained about.
Building a signable ffmpeg without dynamic links
When building ffmpeg on Mac OS, even with all options indicating it should include everything as static, it will still link .dylib files dynamically.
otool -L ffmpeg | grep /usr/local
I solved this by only building my own ffmpeg using GitHub Actions and stripping away all external dependencies like codecs (because we are only doing muxing operations which only requires ffmpeg core functionality.)
See also:
- https://stackoverflow.com/questions/24948966/how-to-compile-a-static-ffmpeg-binary-on-os-x
- https://matthew-brett.github.io/docosx/mac_runtime_link.html
Building ffmpeg to support older Mac OS versions
On the first try I got an error report on older Mac OS X (10.13):
Command was killed with SIGABRT (Aborted): ffprobe -of json -show_format -i vid.mp4
dyld: lazy symbol binding failed: Symbol not found: ____chkstk_darwin
Referenced from: ffprobe (which was built for Mac OS X 10.15)
Expected in: /usr/lib/libSystem.B.dylib
This can be verified by running nm ffprobe | grep ____chkstk_darwin
In order to fix this I had to add -mmacosx-version-min=10.10 to --extra-clfags and --extra-ldflags
Then rebuild and verify that the ____chkstk_darwin symbol reference is gone.
Certificate creation/renewal
First create a CSR: Keychain Access, Menu -> Certificate assistant -> Request a certificate from a CA. Enter email. "Saved to disk".
Go to certificates. See which certificates that are about to expire soon - only generate those.
For notarized only apps (non-App Store), you only need to create this certificate:
Developer ID Application
For Mac App Store and Notarized apps create the following certs:
Developer ID Installer(not needed if already long expiry)Developer ID Application(not needed if already long expiry)Mac Installer DistributionMac App DistributionMac Development
Then dowload them and drag drop into Keychain Access ("Login" keychain). You may then safely delete the downloaded .cer files.
Now regenerate provisioning profile(s). For each of the "App Store" and "Developement" Provisioning Profiles:
- Open the provisioning profile
- Edit
- (For the Development profile only) check all Certificates and Devices, and select the device you registered earlier.
- (For the App Store profile only) check the newly generated "Mac App Distribution" certificate's radio box
- Then Save and Download
For the App Store provisioning profile, run:
base64 < LosslessCut_Mac_App_Store_provisioning_profile.provisionprofile | pbcopy
...then paste the clipboard contents to replace the env variable in the GitHub project PROVISIONING_PROFILE_BASE64.
For the Development profile, add the new profile into the project folder (don't check it into git.)
In Keychain Access go to Login keychain -> My Certificates
For Mac App Store + Notarized apps, select the following certificates (if duplicates, choose the one with the longest expiry):
Developer ID Application: *Developer ID Installer: *3rd Party Mac Developer Installer: *3rd Party Mac Developer Application: *
If notarized build only (no Mac App Store), select:
Developer ID Application: *
Then right click and export to Certificates.p12 with a strong random password, note the password.
In the GitHub project replace:
MAC_CERTS_PASSWORDwith the password you just created.MAC_CERTSto the output of this command:base64 -i Certificates.p12 -o -
Note that in action-electron-builder:
CSC_LINKis calledMAC_CERTS.CSC_KEY_PASSWORDis calledMAC_CERTS_PASSWORD.
Notarization
electron-builder will try to notarize, if it sees the environment variables APPLE_API_KEY, APPLE_API_KEY_ID and APPLE_API_ISSUER.
To generate an API key, go to Users and Access -> App Store Connect API -> Team keys. Generate a new key with access App Manager and download it as .p8.
APPLE_API_KEY: The local path of the downloaded.p8file.APPLE_API_ISSUER: Issuer ID from the website.APPLE_API_KEY_ID: KEY ID from the website (also in the.p8 file name).
Test signing with notarization locally
APPLE_API_KEY="..." APPLE_API_ISSUER="..." CSC_LINK="..." CSC_KEY_PASSWORD="..." yarn electron-builder
Slow signing / notarization
Notarization involves uploading the file to Apple's servers. Sometimes it takes Apple longer to do this. And in your build, electron-builder log output is seemingly stuck at the "signing" step, even though it is actually stuck notarizing. You can check the notarization status with this command:
xcrun notarytool history --apiKey $APPLE_API_KEY_ID --apiIssuer $APPLE_API_ISSUER
Check also Apple's "Developer ID Notary Service" status, it might be having an outage.
Testing mas builds locally
Note that the Electron mas build can no longer be run locally on a dev Mac. For running MAS app locally, we need to create a separate provisioning profile for development, with the Developer Mac's UDID and use mas-dev with that profile. See this issue.
Under Devices, make sure that the your development Mac's device UDID is registered. Be sure to use the Provisioning UDID, not the Hardware UUID More information about registering device.
See also
- https://github.com/samuelmeuli/action-electron-builder#code-signing
- https://www.electron.build/code-signing.html
- https://www.electron.build/code-signing-mac.html
- https://github.com/samuelmeuli/action-electron-builder
- https://github.com/samuelmeuli/action-snapcraft
- https://github.com/samuelmeuli/mini-diary/blob/master/package.json
- https://github.com/electron-userland/electron-builder/issues/4293
- https://github.com/nektos/act
- https://github.com/pyinstaller/pyinstaller/issues/694
- https://support.zabbix.com/browse/ZBX-17114
- https://github.com/acoustid/ffmpeg-build/blob/master/build-macos.sh
- https://stackoverflow.com/questions/25352389/what-is-the-difference-between-macosx-deployment-target-and-mmacosx-version-min
- https://github.com/electron/electron-osx-sign/wiki/1.-Getting-Started#certificates